
This simple mini ham and cheese quiche recipe is perfect for lunchboxes, snacks, and picnics. Packed with smoked ham and mature cheddar cheese, these bite-size quiches are tasty and easily customisable. Plus, you can make them quickly using ready-rolled shortcrust pastry.

Save this recipe for later?
These mini quiches are a fantastic alternative to sandwiches in kids' school lunchboxes. They're not only delicious and easy to transport but also much simpler to make than a full-sized quiche.
Pop a couple of these tasty bites into their lunchboxes, and the kids will love them!
You might also like my shortcrust pastry sausage rolls too!
Jump to:
✔️ Why you'll love this recipe!
- Using ready-rolled shortcrust pastry is a convenient time-saver when making mini quiches, eliminating the need to make pastry from scratch.
- Ready-rolled pastry ensures a consistent thickness and texture, resulting in professional-looking mini quiches every time.
- Customise your ham and cheese mini quiches by adding vegetables like spinach or mushrooms, or spices such as paprika or garlic powder to suit your taste preferences.
- These portable mini quiches are perfect for on-the-go snacking, whether packed in a lunchbox or taken on a picnic.
🛒 Ingredient notes
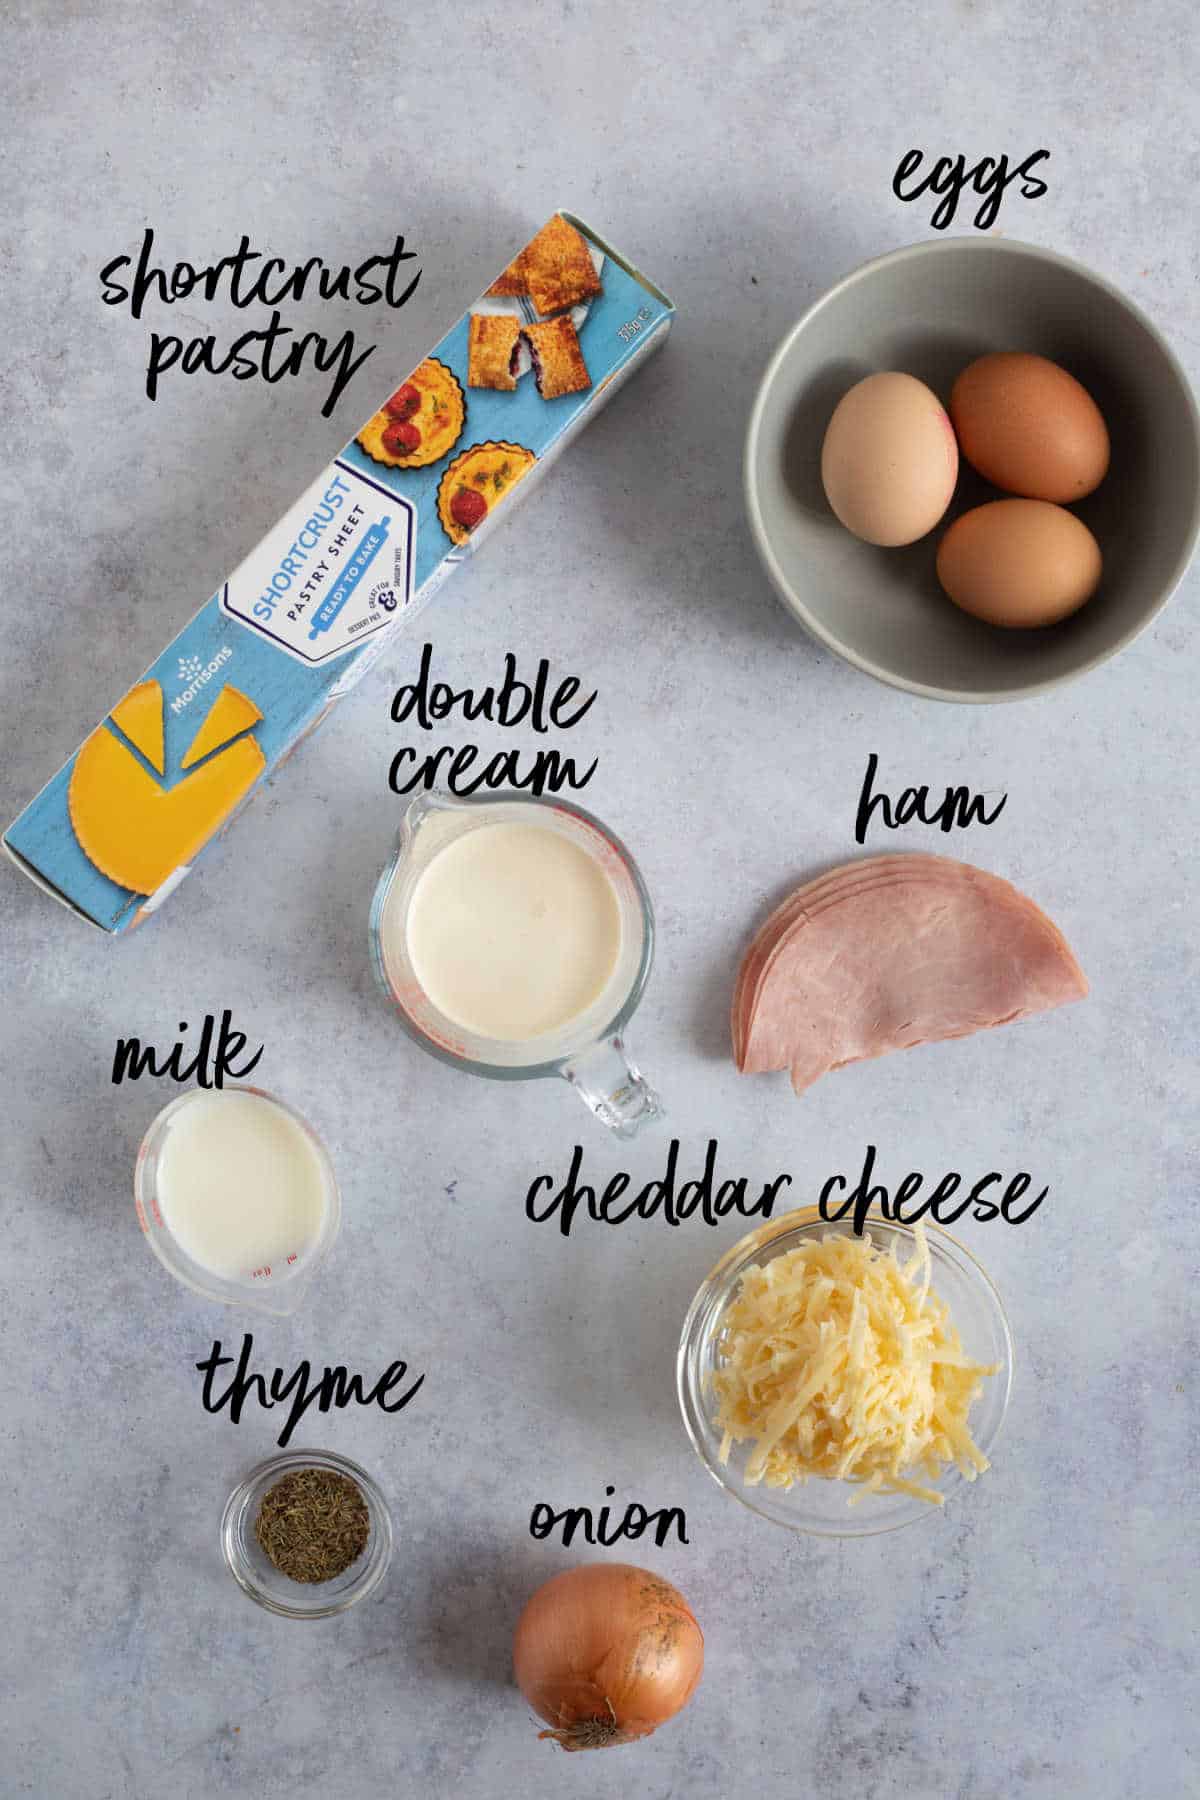
Shortcrust Pastry - use ready-rolled shortcrust pastry to save time, but feel free to use homemade shortcrust pastry if you like making your own.
Eggs - help to set the quiche.
Milk - gives the savoury custard a silky smooth consistency.
Double Cream - provides richness and creaminess.
Olive Oil - for frying the onion.
Onion - for added flavour.
Thyme - dried thyme gives the mini quiches a lovely depth of flavour. Swap for rosemary or oregano, or use a combination of different herbs.
Ham - sliced smoked ham or use leftover shredded gammon!
Cheese - grated extra mature cheddar cheese for the best flavour. Swap for crumbled blue cheese, feta, or Red Leicester!
🔪 How to make mini ham and cheese quiches
The recipe card with ingredient quantities and detailed instructions can be found at the bottom of the post
One: Preheat the oven to 200°C (180°C fan/ Gas 6). Lightly grease a 12-hole bun tin with oil or nonstick spray.
Two: In a small saucepan, heat oil and gently fry the chopped onion and herbs for a few minutes until the onion softens. Stir in the ham slices and set aside to cool.
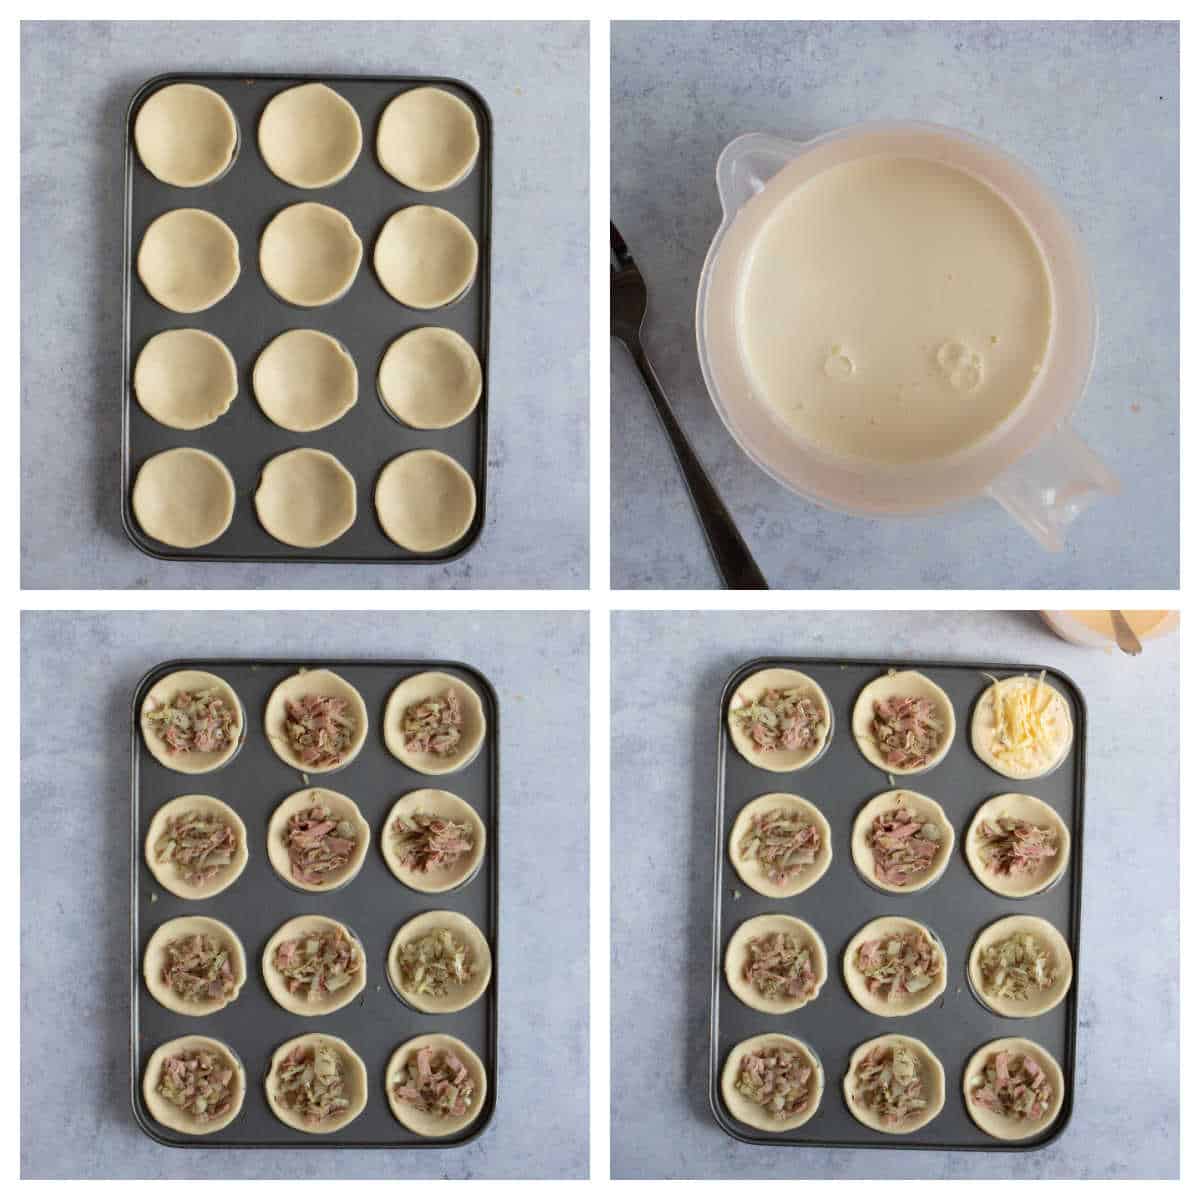
Three: Roll out the pastry on your work surface. Using a 6-7cm biscuit cutter, cut out 12 rounds. Place the pastry circles into the prepared bun tin and lightly press them down.
Four: In a jug, whisk together the milk, double cream, beaten eggs, salt, and pepper.
Five: Spoon the onion and ham mixture into each pastry case.
Six: Pour the egg and cream mixture into each pastry case, then sprinkle grated cheese on top.
Seven: Bake in the preheated oven for 12-15 minutes, or until the quiches turn golden brown. Allow to cool for a few minutes before removing from the tin and transferring to a wire rack to cool further.
Top Tips
- Gently press the pastry circles into the bun tin to create a snug fit, preventing the filling from spilling over during baking.
- Evenly distribute the onion mixture and sliced ham among the pastry cases to ensure a balanced flavour in each mini quiche. Be careful not to overfill, as this may cause the quiches to collapse or overflow while baking.
- Experiment with various mini quiche fillings by incorporating different cheeses, vegetables, or cooked meats to create unique flavour combinations.
- After baking, let the mini quiches cool in the tin for a few minutes. This allows them to set slightly, making it easier to remove and transfer them to a wire rack without breaking.
🍴 Serving suggestions
Mini quiches are delicious served warm or at room temperature.
They make an excellent appetiser for drinks parties and buffets.
Prepare them in advance for picnics or packed lunches, pairing perfectly with cheese scones and flapjacks.
Mini quiches also add a savoury touch to traditional afternoon tea, complementing scones, finger sandwiches, and sweet treats.

📖 Variations
Here are some flavour variations to try:
- Spinach and Feta: Cook chopped spinach until wilted, then mix it with crumbled feta cheese. Place spoonfuls of the mixture into the pastry circles and proceed with the recipe as usual.
- Smoked Salmon and Dill: Replace the sliced ham with thin strips of smoked salmon and sprinkle fresh dill on top before pouring in the egg and cream mixture.
- Mushroom and Gruyere: Fry sliced mushrooms with garlic until they release their moisture. Allow them to cool before placing them in the pastry circles. Top with grated Gruyere cheese for a rich and earthy taste.
- Sun-Dried Tomato and Basil: Chop sun-dried tomatoes and mix them with fresh basil leaves. Spoon the mixture into the pastry circles and add a sprinkle of grated Parmesan cheese on top.
- Bacon and Cheddar: Fry and crumble crispy bacon. Place a spoonful of bacon into each pastry circle, then sprinkle grated cheddar cheese on top before pouring in the egg and cream mixture.
- Roasted Red Pepper and Goat Cheese: Chop roasted red peppers (from a jar or homemade) and combine them with crumbled goat cheese. Fill the pastry circles with the mixture and bake as directed.
🥡 Storage
Store - If you have leftover mini quiches, store them in an airtight container or wrap them tightly with cling film. Place them in the fridge and eat within 2-3 days. Reheat them in a preheated oven at 180°C (160°C for fan ovens) for about 10 minutes until warmed through before serving. They can also be eaten at room temperature.
Freeze - Allow the mini quiches to cool completely after baking. Place them in a single layer on a baking sheet or tray and put them in the freezer for about 1-2 hours. This initial freezing will prevent them from sticking together. Once partially frozen, transfer the mini quiches to a freezer-safe container or resealable freezer bags. Freeze for up to 3 months. You can reheat the frozen mini quiches directly from the freezer.

❓ Frequently asked questions
You can fully bake the mini quiches, cool them, and store them in the fridge for 2-3 days or in the freezer for 2-3 months. Just remember to reheat them before serving.
Ensure that any vegetables or cooked meats are properly drained and cooled before adding them to the pastry circles. Preheating the oven and baking the mini quiches at the recommended temperature will also help the pastry cook and crisp up properly.
Absolutely! The choice of cheese is flexible and can be tailored to your preference. Cheddar, Swiss, Gruyere, feta, or goat cheese are commonly used in quiche recipes. Feel free to experiment and find the combination that suits your taste.
Yes, you can use a muffin tin instead of a bun tin. The main difference is that muffin tin cups are slightly larger than bun tin holes, so you may need to adjust the quantity of filling and baking time accordingly.
Certainly! If you prefer a crustless option, you can skip the pastry and simply pour the filling directly into greased muffin tin cups or ramekins. Just remember to adjust the baking time as crustless quiches may cook faster.
😋 More easy recipes to try!


Tried it? Let me know what you think and rate it ⭐️ below. Tag me @effortlessf00d-I'd love to see! Don't forget to subscribe for more recipes.
Recipe

Ham & Cheese Mini Quiche Recipe
Save this recipe for later?
Ingredients
- 375 g Ready-Rolled Shortcrust Pastry
- 1 Onion chopped
- 1 teaspoon Dried Thyme
- 4 Slices of Ham chopped
- 3 Eggs beaten
- 75 ml Double Cream
- 75 ml Milk
- 100 g Cheddar grated
Instructions
- Preheat the oven to 200C (180 fan/ Gas 6) and lightly grease a 12 hole bun tin with oil or a nonstick spray oil.
- In a small saucepan, heat some oil and gently fry the chopped onion and herbs for a few minutes until the onion becomes soft. Stir through the chopped ham slices and set it aside to cool.1 Onion, 1 teaspoon Dried Thyme, 4 Slices of Ham
- Roll out the pastry on your work surface and use a biscuit cutter (6-7cm) to cut out 12 rounds. Place these pastry circles into a 12-hole bun tin and lightly press them down.375 g Ready-Rolled Shortcrust Pastry
- Whisk together the milk, double cream, beaten eggs, salt & pepper in a jug.3 Eggs, 75 ml Double Cream, 75 ml Milk
- Place spoonfuls of the onion and ham mixture into each pastry circle.
- Pour the egg and cream mixture into each pastry case, and finally, sprinkle grated cheese on top.100 g Cheddar
- Bake in the oven for 12-15 minutes until the quiches turn golden brown. Allow them to cool for a few minutes before removing them from the tin and transferring them to a wire cooling rack.
Comments
No Comments